|
How to Make a Zdarsky Tent
By Lowell Skoog |

|
| A Zdarsky tent in use. Two people can fit comfortably inside and three people can sit shoulder-to-shoulder. |
|
Murray Toft described the benefits of a Zdarsky tent in an Alpine Club of Canada newsletter in the winter of 1994. His article was reprinted in Playing It Safe, a book of selected papers published by the ACC in 1998.
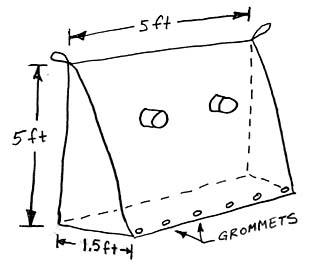
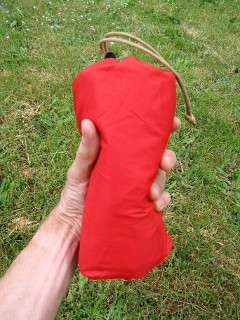
A Zdarsky tent is a European bivi sack design that has been around since the 1930s or earlier. This design is better than a mummy-style bivi sack for many uses. You can get under it without taking off your boots, or even your crampons, since it has no floor. Three people can sit under a Zdarsky tent, sharing warmth. You can even cook under it in a pinch. The loops at the top corners of the tent can be clipped to the tips of skis driven into the snow, anchors on a rock climb, or whatever else you can think of. Since the tent is designed for a person sitting upright, it's best for day use or as an emergency overnight shelter. The tent is especially good as a quick shelter on the go, for example to wait out a rain squall or to rest and stay warm during a cold winter lunch stop. Since the fabric is waterproof, it gets clammy after a while. But with more than one person it can be quite warm. When made from lightweight silicone nylon, a Zdarsky tent weighs just 12 ounces (340 grams) and packs the size of a half-liter bottle. (I've also made an uncoated version, which is even lighter.) To make the tent, get a rectangular piece of coated fabric about 10ft by 5ft (3m by 1.5m). Fold it in half so that each half is about 5ft by 5ft. Get a piece of fabric about 5ft by 1.5ft and cut it in half along the diagonal so you end up with two triangular shaped pieces.
For the two apexes, get some webbing loops a few inches long. (Rock climbers may want to use 1-foot quickdraws for this.) Sew the triangular end pieces onto the tent roof, sewing the webbing loops into the corners. (If you use a quickdraw, sew it through the apex so that you can clip into it from either the inside or outside of the tent.) Sew a pair of tunnel vents on one side of the tent about 1/4 to 1/3 of the way down from the top and in from the ends. The finished tent looks like the diagram shown above. The tent has no floor. In a pinch, you can just drape the tent over your head. It's not necessary to support the apexes, but it's more comfortable if you do. To keep the tent from flapping, you can sit on it or place gear on it. I added several grommets along the base of the vented side of my tent. I attach a few small stirrups made of parachute cord to these grommets. When I'm sitting in the tent I stick the toes of my boots through the stirrups to keep the tent wall from flapping. Then I look out through the tunnel vent and enjoy the view. |
The Alpenglow Gallery